Aries 10" Maksutov-Cassegrain Telescope
|
I have purchased this telescope in November 2007 directly from Aries Instruments in Kherson, Ukraine. I got a chance to meet with Valery Deryuzhin who signed the interferogram report and supervised final inspection and release. The telescope (Aries 10" MC thereafter) is a 10-inch Maksutov-Cassegrain with f/15 focal ratio and 30' field of view that is coma-free and diffraction-limited across the spectrum, from infrared through ultraviolet spectrum. Its optical design is said to be very similar to the limited series 10-inch Astro-Physics f/14.6 High Resolution Maksutov-Cassegrain which is based on the same optics supplied by Aries - a variation of Gregory Maksutov-Cassegrain with an elliptical primary and spherical secondary mirrors. These telescopes feature very low central obstruction and maintain focal ratio that allows a wide range of astronomy applications. Although this telescope is primarily positioned for high power Solar system observations, I am using it fairly successfully for deep sky imaging. Aries 10" MC was primarily designed for planetary observations that require thermally stable environment, and this is known to be a common issue with closed tube catadioptric telescopes. The design of Aries 10" MC has been optimized to deal with this on various levels. The primary mirror is made of fused silica (also known as quartz, SiO2) that has extremely low thermal expansion coefficient. This allows the primary mirror to maintain its precision when the telescope is cooling down to ambient temperature. The back of the primary mirror is polished to allow the heat to radiate outwards, and this makes the telescope to cool down faster. Aries 10" MC features four 12V fans. The pair located at the primary mirror helps the mirror to cool down faster. These fans are not exposed to the environment, so there is no air intake that could contaminate the telescope. Meniscus fans are attached to the OTA and are covered with filters. They are blowing the air out of the OTA. Mixing the air inside the OTA with meniscus fans allows to minimize negative effects associated with tube currents and air slowly pouring into the OTA through the primary baffle tube. Both fan pairs are controlled with a power switch, allowing to operate only the primary mirror pair, or both primary mirror and meniscus corrector pairs at the same time. There is a knob for fan speed adjustment.
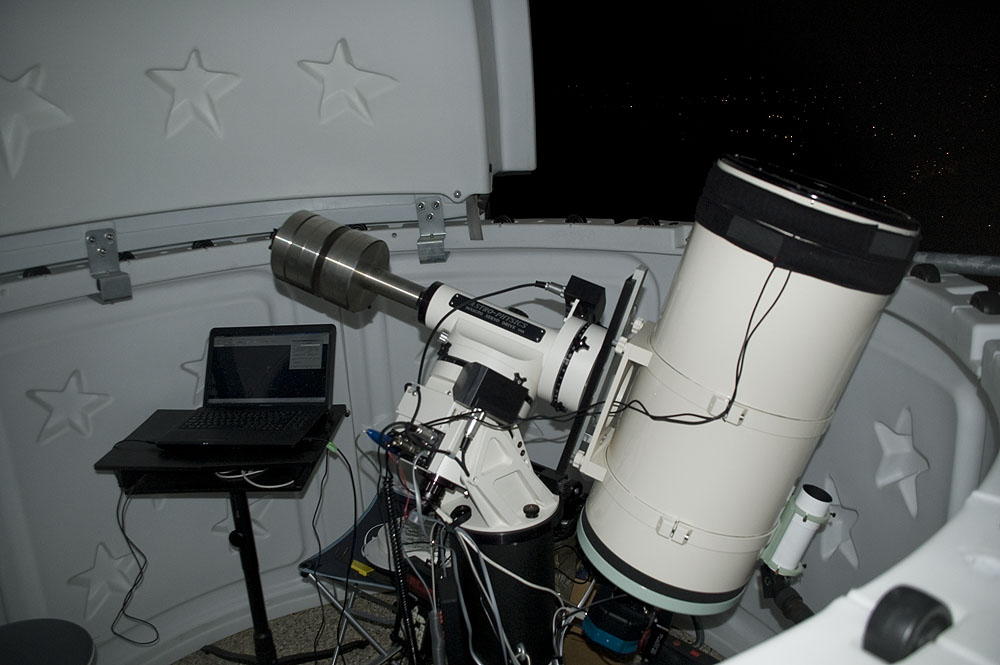
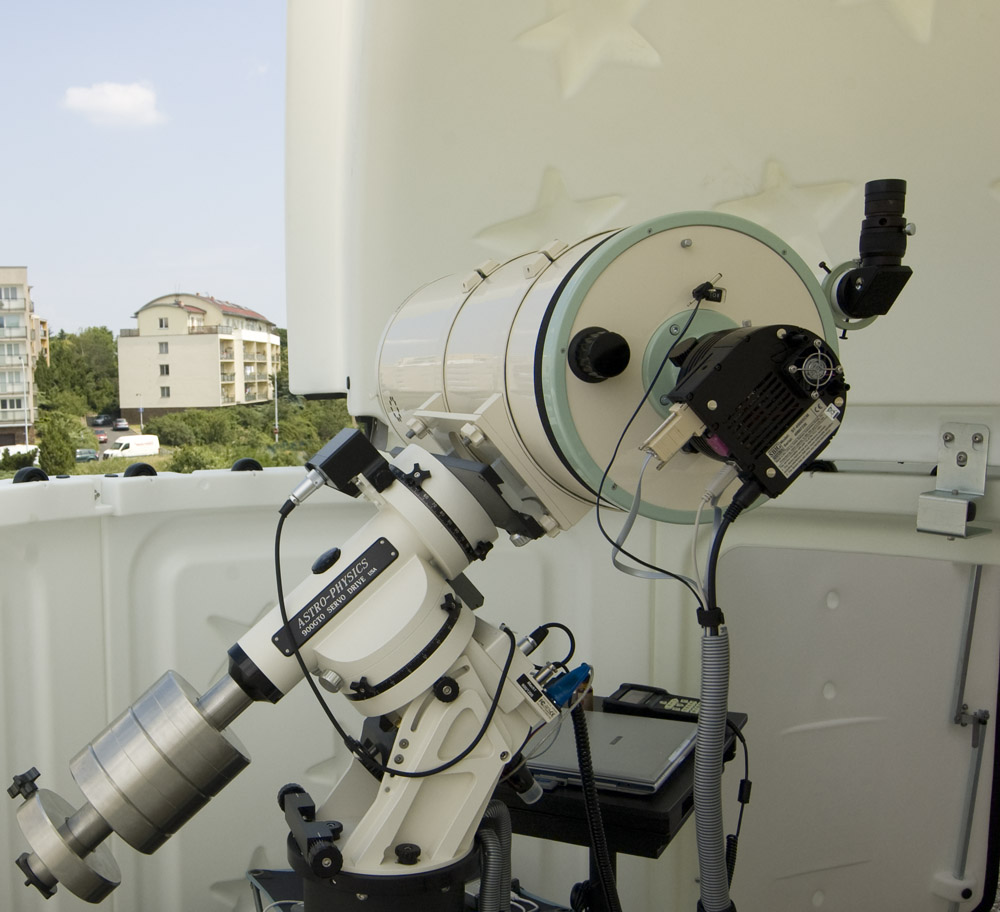
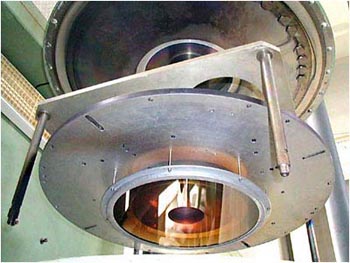
Back end of Aries 10" MC Optical Tube Assembly, shown on Astro-Physics 900GTO mount with SBIG ST-4000XCM camera inside SkyShed POD which replaced my temporary tent observatory.
During the first visual season, I used primary mirror fans quite often during hot summer months, especially when it's hot inside the observatory. Meniscus fans are a double-edged sword though. Once the internal OTA airmass is disturbed, stellar images may become even less steady. I prefer to use meniscus fans during the cool down time only, and shut them off completely during observations. Often I allow the telescope to cool down normally by itself, and use the meniscus fans during extreme cases only. Another important feature of Aries 10" MC design is the removable cap at the back end of the OTA. With the cap removed, the primary mirror back is exposed to reduce the cool down time even further to help the OTA maintain its thermal equilibrium with environment during the night. Primary mirror exposed may get dust particles into OTA though, so this should always be done with care.
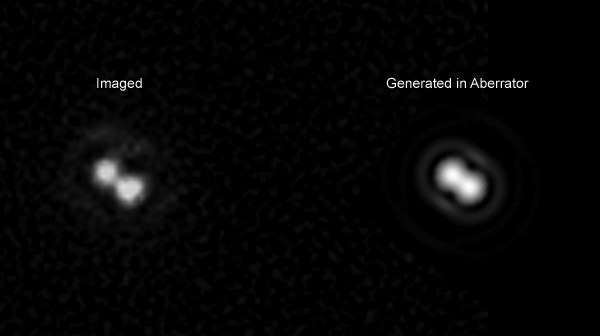
Short Exposure ImagingAries 10" MC features very low 21% central obstruction. When I photographed a rather tight 0.53" separated double star Zeta Bootis (2010), I have noticed Aries 10" MC allows to observe the distinctive shape of the Airy disk along with the first diffraction ring fairly often with short exposure imaging, even when the seeing is a rather poor 4-5 on Pickering scale. I believe that this advantage occurs primarily because of the very small central obstruction that enables to concentrate as much energy in the Airy disk itself as possible, without spreading it into the diffraction rings. The behavior of the diffraction pattern in Aries 10" MC resembles refractor telescopes in some way.
Left: Zeta Bootis at Pickering 4 shows Airy disks seen fairly often during short exposure frames through the Astrovid Voyager monochrome CCD. This allows to practice lucky imaging approach using software like Registax and Autostakkert to produce final image (Center) that has very high signal to noise ratio. There is an elongation visible in the Airy disks caused by the atmospheric dispersion due to the object appearing at approximately 60 degrees altitude when imaged. Right: Zeta Bootis modelled in the Aberrator software.
There is a trade off associated with such a small central obstruction: the stray light getting into view when observing with very low power wide-field eyepieces. This may decrease the contrast at the edge of the field. The telescope comes with a set of three spare baffles of various sizes that can be attached to the front of the meniscus corrector in order to increase the obstruction and eliminate the stray light. This is similar to the AP Maksutov-Cassegrain concept with the 32% obstruction baffle spare provided. The meniscus corrector has a special magnetic holder that makes it very easy to attach and remove baffles. I operate the telescope primarily in the photographic mode with the largest baffle attached (to eliminate flat field problems), although I have not noticed any significant negative effects without any baffles during visual observations. There have been various discussions on whether telescopes with low central obstructions can 'punch' through bad seeing, and for me that looks plausible, although I have never done side-by-side comparison of Aries 10" MC with other instruments I have. With images of such precision, I have been able to concentrate more on the induced aberrations, such as tube currents and atmospheric dispersion, that would have probably been masked by intrinsic aberrations in my other telescopes with lower quality optics. That is, I have been surprised by observing slightly elongated Airy disks due to the tube currents in Aries 10" MC, which faded away when meniscus corrector fans were turned on. The effect, not obviously appearing in defocused images and resembling slight astigmatism or pinched optics aberrations (really seducing me to go look into the mechanical side of things), faded away once the telescope was given enough time to cool down with the back end cap removed. I have to specially thank Valery Deryuzhin who invested great deal of attention and supported me via millions of e-mails and phone calls to identify the real cause of this aberration. Optical quality plays amajor role when it comes to high resolution observations. Detailed optical characteristics of Aries 10" MC are provided in the technical certificate and interferogram report that speaks for itself. Primary mirror, made of quartz, allows to be polished to a very high precision, typically 2 to 4 times better than Pyrex. Additionally, Aries 10" MC optics employ a special post-figuring technology developed in 70's called ion milling, also known as ion-beam figuring (IBF), or ion-cannon technology. During the IBF, the primary mirror is bombarded with a controlled beam of ions to erode material on a molecular level and refine its surface smoothness even further.
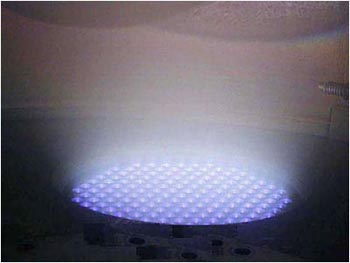
Ion Beam Figuring Process, images from RC Optical Systems (RCOS) which also use Aries Instruments as their IBF optics supplier.
The result is the interferogram accompanying this telescope shows RMS <0.023λ and Peak-to-Valley <0.1λ at λ=632.8nm in double pass auto-collimation scheme with full aperture flat mirror. This is despite my specimen having a very small bubble in the meniscus corrector plate, however I have been assured by Valery that it will not bring any sensible impact on the image quality. The corrector and secondary mirror are made of Ohara BK7 glass. These materials are expensive, however they are critical components in the grand plan allowing Aries 10" MC to achieve refractor like performance under the stars.
MechanicsMechanically, Aries 10" MC design is based on a different approach if compared to just any of the commercial telescopes I used before. Aries 10" MC is not designed fool-proof and requires the operator to be aware of nuances. The OTA is made of the aluminum alloy with internal circular spants that increase stiffness and serve as light baffles at the same time. It is rigid, however the gloss paint requires a very delicate care. (Much softer than Celestron SCTs.) Aries 10" MC focuser maintains the collimation and moves the mirror by it's centerline, and not off-axis which is a very big plus. This assures zero image shift, however the downside of it is that one can get the focuser to loose grip - ouch! - with the mirror by turning the knob too far in one direction - that required a quick fix with the back end cap removed to return the focuser into operating position. The backfocus is rather tight: I have not been able to get my Denkmeier Standard binoviewer to work without using the 2X multiplier cell, and that is something I could easily do with, for example, the Celestron C-11S. This means I will lack wide field views with two eyes, although the binoviewer can still be used without any problems for medium and high power observations. At one side, the telescope makes you to believe that it sacrifices some of its properties to achieve the primary purpose - high power observations, by all the means. At the other side, the more I use it, the more I understand that it would be very difficult to make it better. The telescope performs all it's functions and provides plenty of tools to combat thermal stability issues and features zero shift focusing.
Aries Instruments has supplied this telescope in a sturdy heavy-weight wooden box, not optimized, however, for any long-distance travel, as it lacked any dampering features. The packaging was spartan, and I had to find miscellaneous items on my own, such as the power cord for the fans, finder bolts, as well as inquire a local astronomy shop to help me out machine a custom adapter between the rings and the Astro-Physics dovetail plate. As far as I can understand from the 10" AP Maksutov-Cassegrain report by Jay Reynolds Freeman, he forgot to order his power cord for the fans as well, and it's not part of the default OTA supply, although Astro-Physics has shipped one free of charge. As far as I know, both AP and Aries do not manufacture these telescopes anymore, and rumors are the primary reason for that is that the production process is extremely complicated. AP, however, introduced 12-inch f/12.5 Maksutov-Cassegrain with 28.8% CO and carbon fiber OTA, weighing 29.5 kg - a very different beast requiring much heavier mount. As far as I know, Aries is now concentrated on medium to large sized apochromatic refractors.
Deep Sky ImagingI have been pleased with the way Aries 10" MC performs as deep sky astrograph. Because the back opening is only 2", this limits the CCD sensor size I could use. Because of that, selectring the correct focal reducer is the key to achieve good sampling ratio, which I believe, should be somewhere around 0.5" to 0.8" per pixel in my seeing conditions. I have tried the STF 0.53X and Astro-Physics 0.67X reducers, and ultimately settled on AP. (Although my colleague, Vlad Onoprienko, has STF working very well with his 9" Santel MCT.) The AP reducer provided enough light to cover the guide chip on both of my cameras and the star fields were sharp enough to name it a 'final' DSO imaging setup. With 0.67X reduction, my ST-4000XCM (KAI-4022CM color) camera provides 0.6" per pixel when used with AO-8, and QSI 532wsg (KAF-3200ME) camera runs at 0.53" per pixel sampling.
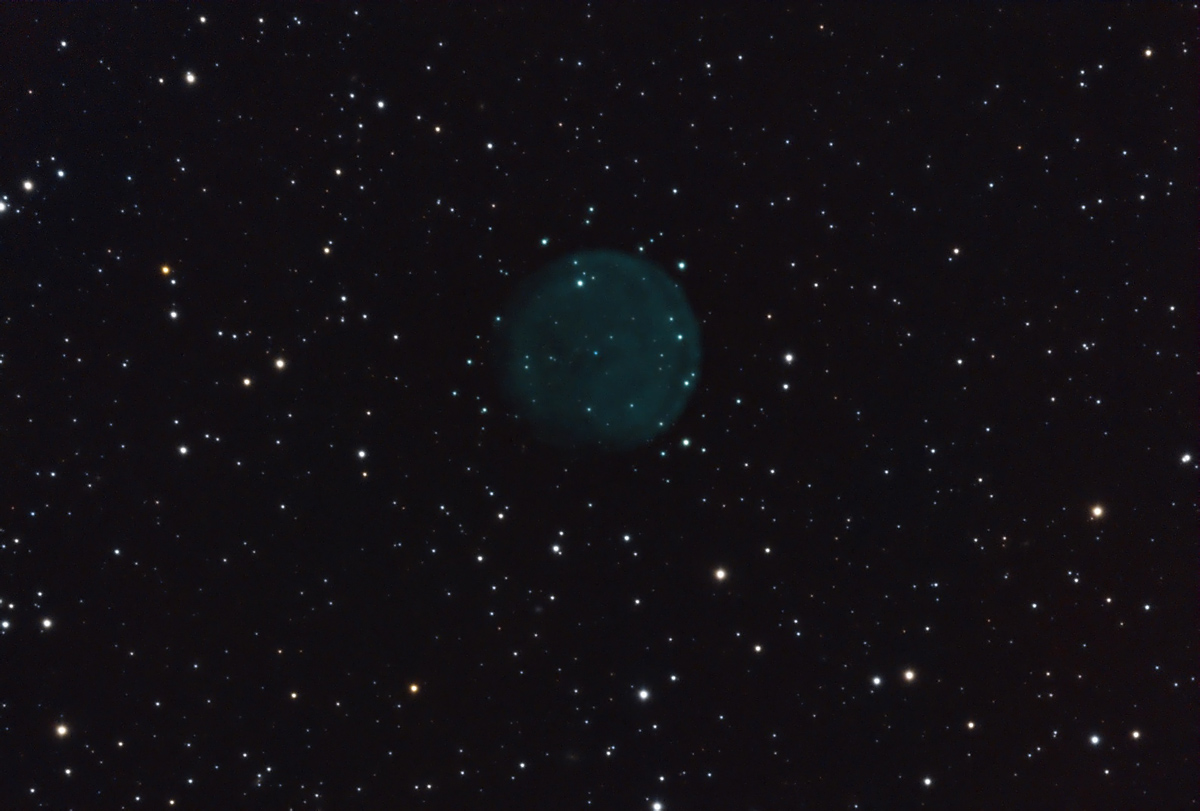
Abell 61 - faint planetary nebula in Cygnus. Despite 45 minute exposures through narrowband [O III] filter for a total of 8 hours, there is absolutely no mirror shift due to excellent mechanics of the telescope. 100% of frames are good.
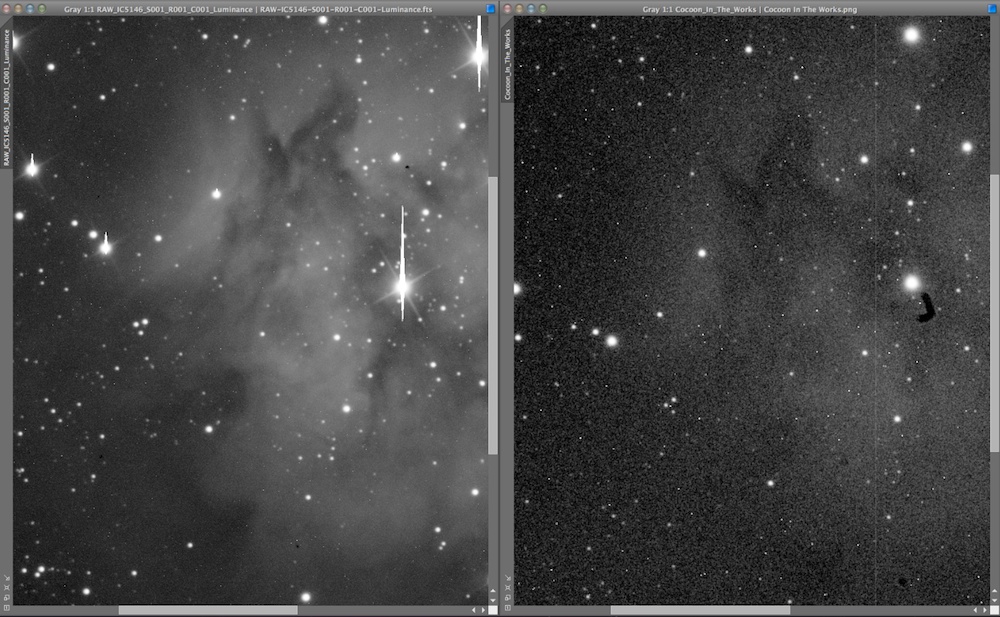
A very unhonest comparison of IC 5146 (The Cocoon Nebula). Left: 24" RCOS with back-illiuminated CCD (>80% QE) and 5 min exposure under very dark skies of Rodeo, NM (USA). Right: 10" Aries MC with ST-4000XCM and 20 min exposure under heavily light polluted skies near the center of Prague, Czech Republic (with IDAS LPS filter). Although the 24" telescope has captured insane level of SNR during this exposure, Aries did a pretty good job, resolution-wise. So far I have done a few shots - monochrome, RGB and narrowband - with this telescope and I am fairly pleased with results. All images are available in the Deep Sky section of my site. I am averaging at approximately 1.8" to 1.9" FWHM during both March-April and June-July imaging seasons in Prague and I am pleased with this level of seeing, considering this is a terrace observatory which is a few meters away from the kitchen. On some occasions, I see 1.2" FWHM which is considered to be very good among amateurs.
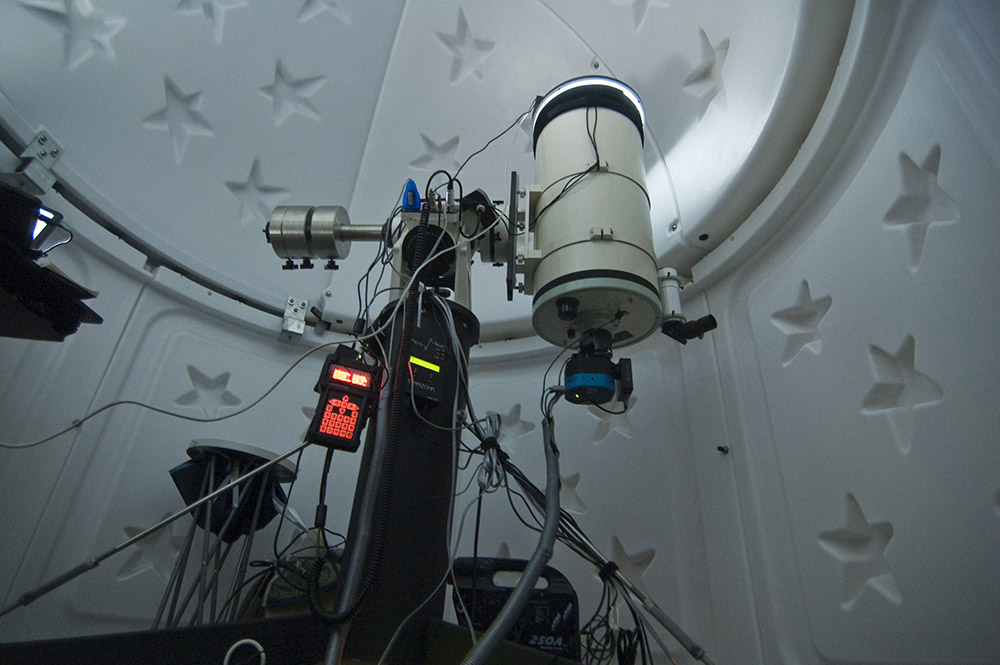
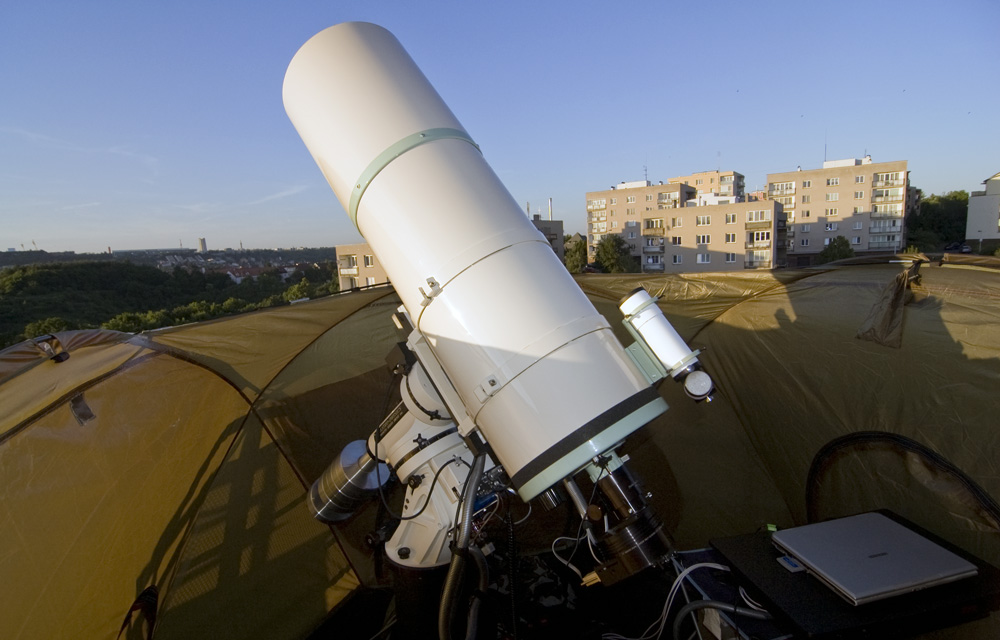
Aries 10" MC while imaging deep sky. The telescope is starting on the wrong side of the mount intentionally in order to allow imaging through the meridian.
There is a number of additional accessories I have invested into to make this a complete astrograph: 1) FeatherTouch FTF2008BCR motorized 2" focuser with ASCOM drivers, controlled by FocusMax software. 2) Filters: Astrodon Tru-Balance, set of 3nm H-alpha, O-III, N-II and S-II, and E-series RGB. The QSI 532wsg camera has off-axis guider port installed in front of the filter wheel, so this allows the guider camera to operate at broadband while imaging at narrowband. I am using Moravian Instruments G1-0300 monochrome guider built on the Sony EXview HAD ICX424AL chip with 656x494 7.4μm pixels. 3) Meniscus dew heater with simple analogue controller to combat humid European nights. (Thankfully, it has not degraded FWHM much when operated at approximately 75% power.) 4) Alnitak Flatman L flat field box. The observatory is controlled from Lenovo G550 laptop, located inside the dome. It is wirelessly connected to my main router and supervised via VNC remote desktop connection from the desktop computer indoors. The observatory is automated via CCDAutoPilot software which allows me to run imaging session autonomously. This includes precision slewing to target (within 5"), periodic re-focusing due to temperature changes, changing filters, shooting light, dark and bias frames, G2V calibration - pretty much all the routine. The only parts I do by hand are opening/closing the dome and the telescope cover, syncing to sky and setting up Flatman. I have made a notice to myself on the startup and shutdown sequence - for those who are curious it is located here.
Early morning: shooting flat field frames after the imaging session.
Althogh I love my SkyShed POD, there is a very big disadvantage I have with it and that is the limited amount of zenith available. I have to start on the wrong side of the mount to image through the meridian. Because of this, I need to start when the object is at about 70 deg altitude when telescope is facing East, so the OTA is very close to the observatory wall, as shown on the photo above. I can image approximately 3 hours per night, up to about an hour after meridian crossing. This provides me with about 2 hours worth of data when using 5 minute exposures. After that I need to wait for the object to appear at about 60 deg altitude and below - on the other side of the meridian, which usually makes little sense to wait for that long. Because of that, I usually image objects starting at about 70 deg altitude and up to 1 hour past the meridian and then, if dark sky allows, switch to the next object coming up on the 70 deg altitude.
The bottom line is that Aries 10" MC is a versatile 10-inch Maksutov-Cassegrain with premium ion-milled optics from worldwide recognized opticians, optimized for high resolution observations. It has its certain usage limits one has to be aware of. It requires patience, time and practice to leverage good seeing conditions, master all the thermal stabilization tools Aries 10" MC delivers, and unleash its full potential. It performs well for deep sky imaging using medium sized CCDs. Although it is not capable to deliver wide fields using large CCDs, such as Ritchey-Chretien astrographs, it provides lots of fun leveraging high resolution to image compact objects.
Clear Skies! Maxim Usatov
February 2014 Update. The more I own this telescope, the more I admire this Deryuzhin implementation of MCT. 7 years after I first bought it, the telescope remains perfectly collimated. Here is my visual observatoin of Jupiter dated 4th of February: Just yesterday I had an out of this world view of Jupiter in my 10” Aries Maksutov-Cassegrain and Baader Mark V binoviewer. Let me put it this way: I could have never thought I would prefer visual observations to many magnificent photographs shown on this and other forums online. I was convinced that visual observations these days are doomed to be dominated by photography just about under any circumstances. Boy, I was wrong! It seemed that I could visually observe everything that was there on the disc that night. The image sharpness and the transmission of colors at 356X mag as seen through the pair of 18mm Baader Classic Orthos was breathtaking: neutral tones of the laser-sharp jovian disc over a pitch-black background, highly saturated “foxy”-colored GRS with sharp dark-red vortex structure inside it and vividly blue festoons - it seemed like all the scatter has been blown away by the wind and I am approaching Jupiter’s orbit! During the very special moments, when the sky became exceptionally calm, Jupiter’s belts convolved into the rich dark-brown color with saturated reddish tones, and the reef area in the South Equatorial Belt adjacent to the GRS was resolved into sharp and distinct turbulence ribbons - you could see sharp thin patches of dark clouds clashed between the bright reefs! On the other side of the GRS, the active South Equatorial Belt was busy with the wide variety of small, high-contrast bright spots and structures. This night the clouds in the Equatorial Zone almost appeared 3D-like: you could see the very thin details of cloud edges that only appear usually in good photographs, and the texture and the abundance of minuscular details in the polar regions were amazing. From the aesthetic point of view it is the light flux, the colors, the liveliness and the contrast of Jupiter that blew me away. No display, even the highly praised IPS, can transmit this. In the Equatorial Zone I was surprised by the appearance of a bright white plume that shined much brighter than the zone itself. The plume just glowed there near the Jupiter’s central meridian. On an average night those white plumes, once I am able to identify them later on with the help of photographs here on CN and other forums, are blurred with the bright zone background when observed visually. However last night the plume glow was more than obvious and it stood as prominently as, perhaps, the GRS itself, or any other major jovian feature. The plume appeared as a “fat” comet-shaped cloud with uneven gray flows around it. It seemed like you could observe the snapshot of its dynamics as the cloud poured out from the South Equatorial Belt up into the milky zone. Raising the magnification higher to 400X with TMB Supermonocentrics, the image of Jupiter was not as bright, however still sufficiently sharp with vivid colors appearing during the moments of exceptional seeing, when it seemed like somebody took the Earth’s atmosphere away. Those special moments appeared for 10-15 seconds intervals and they lasted for about a total of 15 minutes during the whole 2-hour observing session that night. Despite eyepieces fogged up and my runny nose, it was one of the best nights with Jupiters I’ve ever had! Based on the D. Peach images, I have created a simulation of what I usually see in the eyepiece during the moments of poor, average and exceptional seeing: http://trafyx.com/astro/Jupiter-Simulation/ Links: http://www.company7.com/astrophy/maks/250f146.html |
| For all contacts: maxim.usatov -at- bcsatellite.net 2006-2010 |
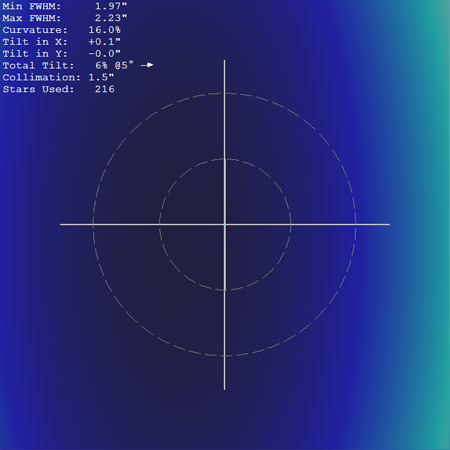 As I purchased this telescope, it survived a car trip from Kherson to Dniepropetrovsk (think roads in Ukraine), and then the air freight to Prague via DHL. The measured collimation error was 1.5", as reported by the CCDInspector on the real sky open star cluster image analysis. (This has been measured at prime focus, 60s guided exposure.) Just to mention, as per Paul Kanevsky, <5" error is considered as nearly perfect. Although, as Valery says, Aries 10" MC is designed the way it will never need collimation adjustments if operated properly, it features collimation screws hidden under the cap at the back end of OTA, and it comes with an instruction describing how to collimate it properly with an interferometer, as well as the extender tube to reach proper back focus during the procedure. My only comments about the mechanical execution would go to that I would prefer a telescope of such a long focal length to be equipped with built-in dovetail plate rather than rings, in order to avoid orthogonality issues that I found to have plenty. Finally, a very important mechanical feature of Aries 10" MC is its weight. Because quartz is much stronger than Pyrex, it allows mirrors to be made thinner: the whole OTA is just 15 kg, not including the rings. This allows to maintain portability and user lighter mounts.